Does anybody have a link for OEM black bow tie emblems for a 2015? Also are the 2017s interchangeable bc i can find those? Thanks in advance
↧
Black Bowtie 2015
↧
Interesting information about crash testing
This guy is not my favourite journalist, but this is one of his better videos.
https://www.youtube.com/watch?v=WSVJMKd-6jI
https://www.youtube.com/watch?v=WSVJMKd-6jI
↧
↧
How to: DPF, DEF removal and downpipe/egr delete/oz tuning flash install.
I took the time to do a full writeup on this mod. I’d like to give a specific shoutout to sparspangled6.0 and Aaron/VA for their contributions and most of the photos I utilized for this writeup. This project is not necessarily a beginner project and I’d suggest if you have no mechanical experience to seek the help of someone who does. This writeup is meant to be a GUIDE and should not be seen as an instruction sheet. Use common sense always!
Required tools:
DPF Removal (credit to starspangled6.0):
Congratulations! You have now removed the DPF from your Chevy Cruze!
Oz Tuning Downpipe installation:
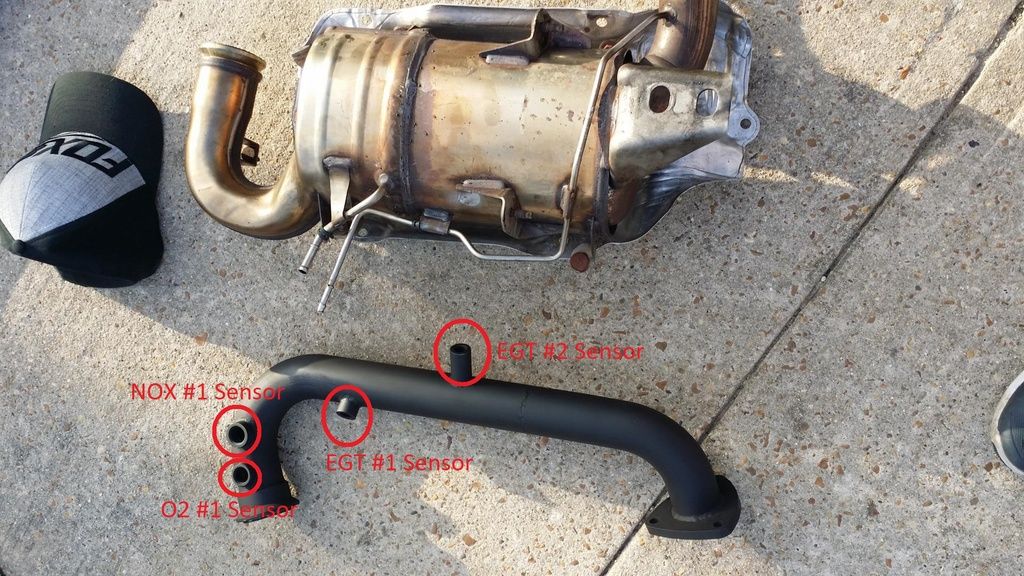
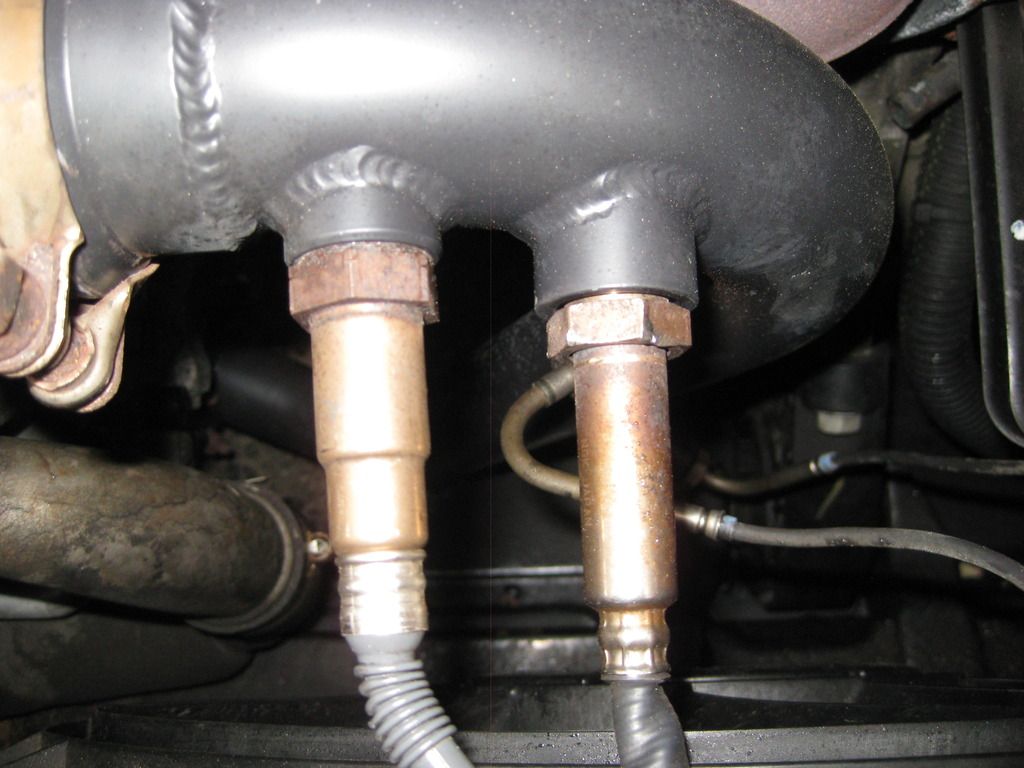
1. Each bung in the downpipe has been appropriately sized for each sensor. Thread the O2 sensor you just removed from the DPF into the appropriate bung in the downpipe before installation.![]()
2. Place downpipe into position, reinstall metal exhaust gasket and work Turbo/downpipe clamp around new downpipe. Take your time and if possible, use two sets of hands.
3. Go underneath the vehicle and hand-tighten exhaust flange bolts connecting downpipe to exhaust.
4. Re-install NOX #1 Sensor, EGT #1 sensor and EGT #2 Sensor
![]()
5. Vacuum lines removed from DPF are not utilizing with the downpipe
6. Ensure everything lines up and tighten down connections
7. Re-install lower engine splash guard
8. Lower vehicle back to ground level
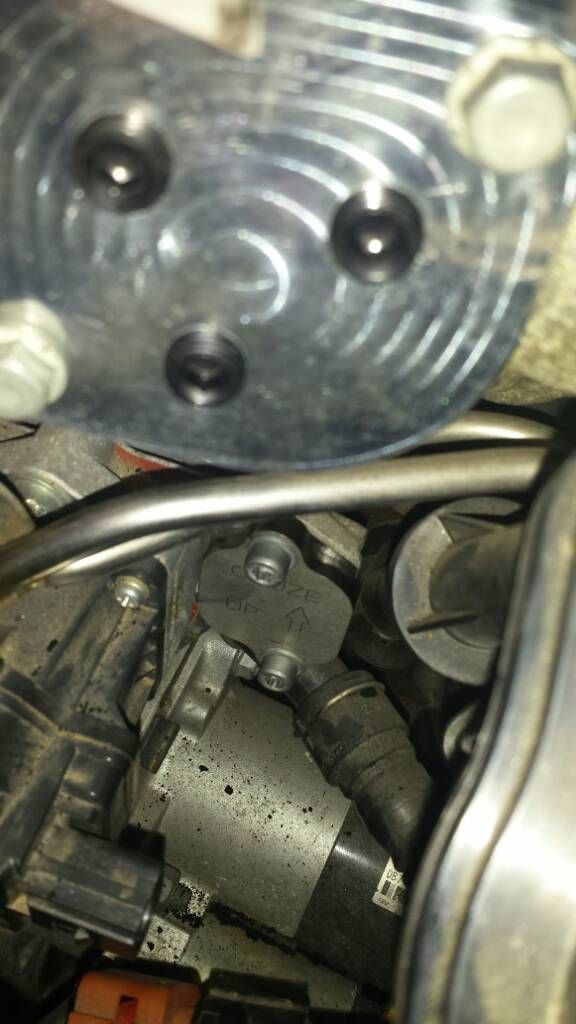
EGR tube removal (credit to Aaron/VA):
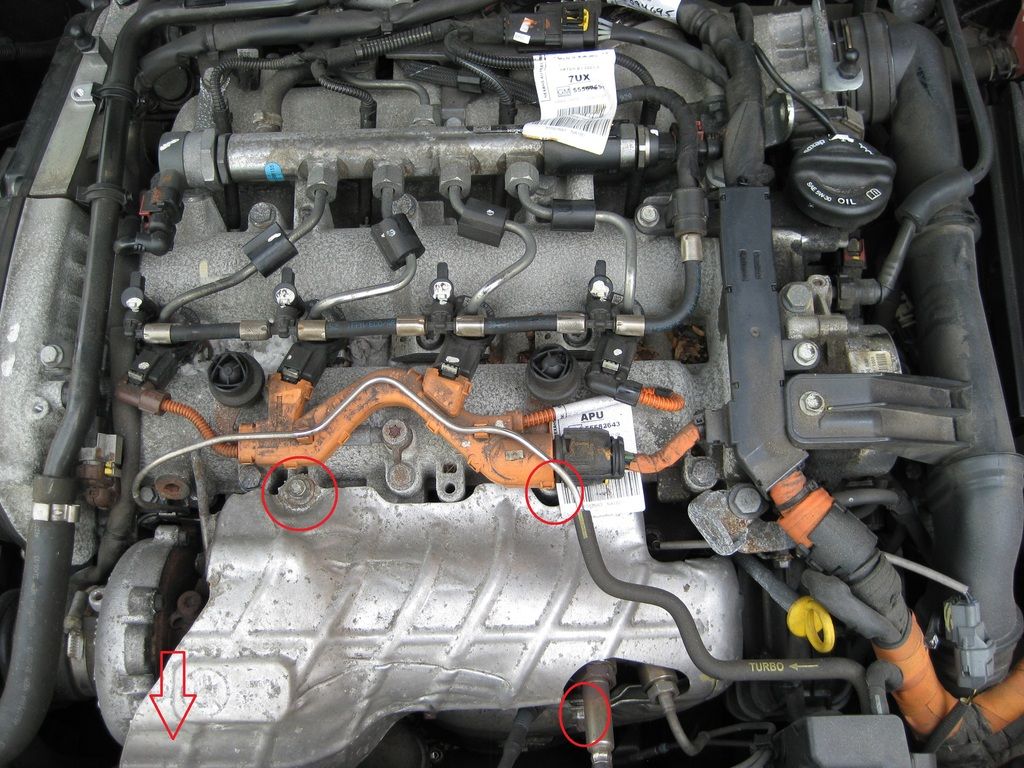
1. Locate EGR tube on backside of engine block, near heater hoses and firewall
2. Remove 2 10mm bolts from EGR tube intake plate
![]()
3. Run your hand down the tube and locate the EGR sensor wire, trace this wire back and unplug it from connection on rear of engine block. This connection REMAINS UNPLUGGED!
4. At the base of the EGR tube, locate two hex head bolts holding tube to EGR actuator valve, remove both bolts.
![]()
5. Looking down at the EGR tube, you will see a brownish/orange connection that goes to the EGR actuator, remove this connection, this connection REMAINS UNPLUGGED!
6. Remove the EGR tube and ensure both gaskets are removed from mating surfaces.
EGR delete plate install (credit to Aaron/VA):
1. Start with the lower plate, orient plate and gasket, thread bolts into plate and gasket first, then put into place and tighten at engine block
![]()
2. Same with intake-side plate, orient and thread bolts through plate and gasket, then attach to intake.
![]()
3. Install 3 NPT plugs into intake-side plate using thread sealant.
OZ tuning ECM recalibration / Flash:
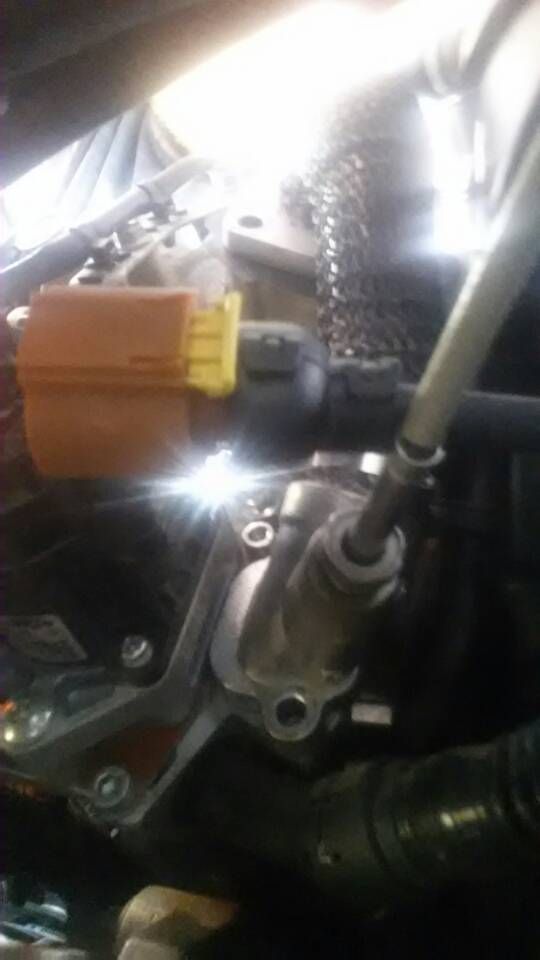
1. Locate the Throttle Valve connection in engine bay, it is located underneath the throttle valve and is pain in the butt to get at! Unplug this connection, this connection REMAINS UNPLUGGED!!!!!
2. Re-connect battery if you haven’t already done so.
3. Follow OZ tuning directions included in with your software.
4. ENJOY!
DEF tank removal (optional):
1. Remove trunk contents, trunk carpet, trunk floor.
2. Using the needlenose pliers, remove the 3 holddown bolts from top of DEF tank
3. Remove Styrofoam cover
4. Locate DEF tank and remove both feed and return DEF lines from top of tank.
5. Remove large electrical connection from rear of DEF tank
6. Locate 3 13mm bolts holding DEF tank to well, remove bolts.
7. Pull tank and components
Some additional notes I took while I did this install:
Required tools:
- 7mm,10mm,13mm,15mm,16mm socket (regular and deep)
- 3/8 ratchet and small extensions
- 10mm, 13mm,15mm open head wrench
- Various crescent wrenches for sensors (forget the sizes)
- Air ratchet (optional, but makes life so much easier)
- Needlenose pliers
- Vise-grips
- Small flathead screwdriver
- Ballpeen hammer
- Small pry bar
- PB blaster
- Hex head socket set or long hex head wrench
- Small pick for locking electrical connections
DPF Removal (credit to starspangled6.0):
- Park car on level ground and set parking brake, chock rear wheel to prevent any movement.
- Pop hood and disconnect battery connections.
- Remove engine cover and set aside
- Using a 10mm socket, take the upper heat shield off (4x 10mm bolts/nuts).
![]()
- Using a 16mm deep socket, loosen the DPF/Turbo clamp, spray with pb blaster
- Pull the NOX #1 Sensor, EGT #1 and EGT #2 Sensor from the DPF, set these aside safely (Don’t need to disconnect them). Use a crescent wrench or sensor socket to pull these sensors!
- O2 #1 Sensor remains in DPF until removed from vehicle. This sensor MUST be disconnected at the plug located along the radiator support.
![]()
- Remove as many bolts / nuts holding lower heat shield onto DPF before jacking up vehicle. They are all 10mm, and I believe you can access at least 4 of them from the topside of engine bay (one is tucked on the side of the DPF driver side while looking at vehicle, this one was tricky).
- Jack the front end of vehicle up as high as your equipment will allow for, and secure with jack stands. Re-check parking brake and never work under a vehicle without someone else around just in case!
- Crawl underneath the car, and using your flathead and 7mm wrenches, remove the lower engine splash guard. A combination of 7mm bolts and push pins are used to hold this splashguard in place.
- Spray exhaust flange bolts with PB blaster.
- Working from underneath the vehicle, remove the remaining 10mm bolts/nuts holding the lower heat shield onto the DPF. Ensure heat shield is totally unbolted from DPF and remove it from the TOP. (You may need to bend the lower portion of the heat shield in order for it to clear during removal)
- Be CAREFUL to thread O2 sensor wiring through heat shield during removal!
- Pull the 3 bolts from the exhaust flange (13mm)
- Next, remove the two bolts anchoring the DPF to the oil pan
- Next, you must unbolt the DPF bracket from the engine block and from the DPF. Remove the two bolts that hold the DPF to the bracket, and then remove the two bolts that hold the bracket to the engine block (access all of these bolts from underneath car and use air ratchet with extension and deep 15mm)
- Go back up to the DPF/Turbo clamp and remove the DPF from the turbo. Using a small pry bar and medium screwdriver, gently work the clamp off the DPF leaving it on the turbo. Avoid bending this clamp with pliers or channellocks. Save metal gasket for installation of downpipe
- The DPF should now be loose and drop slightly down towards the bottom of the car. Working from the top, locate the two vacuum lines on the driver side DPF and disconnect them (it helps to have the extra room to access the hose clamps if the DPF is hanging down off of its mounting brackets)
- Remove DPF unit from underneath vehicle. Be careful NOT to snag A/C connections!
- With the DPF out of the vehicle, use appropriately sized crescent wrench or sensor socket to remove O2 sensor from DPF.
- Using the appropriate sensor cleaning solution, clean all sensors that have been removed before reinstallation into race pipe.

Congratulations! You have now removed the DPF from your Chevy Cruze!
Oz Tuning Downpipe installation:
1. Each bung in the downpipe has been appropriately sized for each sensor. Thread the O2 sensor you just removed from the DPF into the appropriate bung in the downpipe before installation.
2. Place downpipe into position, reinstall metal exhaust gasket and work Turbo/downpipe clamp around new downpipe. Take your time and if possible, use two sets of hands.
3. Go underneath the vehicle and hand-tighten exhaust flange bolts connecting downpipe to exhaust.
4. Re-install NOX #1 Sensor, EGT #1 sensor and EGT #2 Sensor
5. Vacuum lines removed from DPF are not utilizing with the downpipe
6. Ensure everything lines up and tighten down connections
7. Re-install lower engine splash guard
8. Lower vehicle back to ground level
EGR tube removal (credit to Aaron/VA):
1. Locate EGR tube on backside of engine block, near heater hoses and firewall
2. Remove 2 10mm bolts from EGR tube intake plate

3. Run your hand down the tube and locate the EGR sensor wire, trace this wire back and unplug it from connection on rear of engine block. This connection REMAINS UNPLUGGED!
4. At the base of the EGR tube, locate two hex head bolts holding tube to EGR actuator valve, remove both bolts.
5. Looking down at the EGR tube, you will see a brownish/orange connection that goes to the EGR actuator, remove this connection, this connection REMAINS UNPLUGGED!
6. Remove the EGR tube and ensure both gaskets are removed from mating surfaces.
EGR delete plate install (credit to Aaron/VA):
1. Start with the lower plate, orient plate and gasket, thread bolts into plate and gasket first, then put into place and tighten at engine block

2. Same with intake-side plate, orient and thread bolts through plate and gasket, then attach to intake.
3. Install 3 NPT plugs into intake-side plate using thread sealant.
OZ tuning ECM recalibration / Flash:
1. Locate the Throttle Valve connection in engine bay, it is located underneath the throttle valve and is pain in the butt to get at! Unplug this connection, this connection REMAINS UNPLUGGED!!!!!
2. Re-connect battery if you haven’t already done so.
3. Follow OZ tuning directions included in with your software.
4. ENJOY!
DEF tank removal (optional):
1. Remove trunk contents, trunk carpet, trunk floor.
2. Using the needlenose pliers, remove the 3 holddown bolts from top of DEF tank
3. Remove Styrofoam cover
4. Locate DEF tank and remove both feed and return DEF lines from top of tank.
5. Remove large electrical connection from rear of DEF tank
6. Locate 3 13mm bolts holding DEF tank to well, remove bolts.
7. Pull tank and components
Some additional notes I took while I did this install:
- I did this whole mod by myself, overall took about 5.5 hours with beer and lunch breaks
- Get as much as you can done with the car on the ground, and then put it up to work underneath. It's a PITA to get to the engine bay with the car on jackstands
- Spray the downpipe/turbo clamp and exhaust flange bolts with some PB blaster before you begin to work
- Disconnect the battery before attempting to remove the EGR tube...if you wrench hits the starter bracket it will arch!
- The vacuum hoses that are removed from the DPF don't get re-attached
- There are THREE electrical connections that remain unplugged after flashing the car with the OZ tune, the EGR sensor that is directly on the EGR tube that you remove, the Brown/Orange plug right next to the EGR tube (I believe its the EGR actuator), AND the plug underneath the Throttle Valve!
↧
NEWBIE to CruzeTalk
Just purchased a 2013 Cruze LS, 1.8L, 26K miles, Black - SALVAGE title Cruze. Plan is to rebuild it to an operable vehicle.
From Johnstown, PA
I'm sure I will be looking for advice and pointers on repairing the damage (Front end and hood - not too concerned about)
The portion of the repairs I am most skeptical about are the air bags that have deployed. I have not seen very much informative information on this site yet about replacing deployed airbags, and not sure what I'm really going to be getting into. I will search for more information and if there isn't anything very detailed with pics, I will do so as I have on other vehicle forum sites to help others out!
Semper Fi
↧
for sale Bluetooth Pdim 22829143
I have the Unit for sale works great . reason I'm selling I did the Mylink upgrade
Pm me for price include postal code for shipping prices to .
Pm me for price include postal code for shipping prices to .
↧
↧
Hello Everyone!
Hello!
My name is Brandon and I'm new to this forum. I picked up a 2015 Chevy Cruze LT a little while back. Was interested in finding some cool looking aftermarket headlights for her. Looked around and didn't see a whole lot for the 2015 Cruze. Anyone out there have aftermarket headlights not their 2015 Cruze? Would love to know!
Thanks!
↧
Adding OEM TPMS to 2013 Cruze
Hi guys,
I am looking to import my 2013 Cruze to the US for personal use and I am told by my GM dealership that they cannot install an OEM TPMS system on my car (which I need to make it compliant with FMVSS standards).
Has anyone seen or heard that this can be done?
Thank you,
Cristian
I am looking to import my 2013 Cruze to the US for personal use and I am told by my GM dealership that they cannot install an OEM TPMS system on my car (which I need to make it compliant with FMVSS standards).
Has anyone seen or heard that this can be done?
Thank you,
Cristian
↧
Custom Tail Pipes
Since this is not a performance mod I'll post it here. I wanted an F30 328i look so I purchased a galvanized Y-pipe, two (6" long x 2.5" diameter, rolled, tips) from the local Holley store. FYI: Bowling Green KY is hot rod central. Home of Holley Performance, the Corvette Assembly Plant, NCM, NCMP, LS fest, and much more :) ... But I digress... I sprayed high temp matte paint on the ID of the tips, MIG welded all three components together (1/2" offset, dual tips), drilled 1/8" drain holes, and trimmed the valance a bit. Then I took the completed tailpipe assembly to my local exhaust shop (Mark Muffler) where they cut off the pipe from the OEM muffler, fab'd up a connection pipe, welded the assembly that I brought them, sandblasted the connection pipe and y-pipe, welded on a hanger that connected the tailpipe to the rear OEM exhaust hanger bracket, and then coated the connection pipe and y-pipe with more high temp matte paint for corrosion protection.
I did this because the factory tailpipe looked weak AF, and paying $500+ for a cat-back, that yielded no power, was absurd. $100 for parts, 2 hours of personal labor, and $100 for paid labor. Great deal and look IMO. Plus, I haven't found an aftermarket exhaust that replicates this look. The ZZP DP yields the flow I need for the BNR tune on 20+psi, and the Holley tips give it the look that it needs for a 15.0, 1/4mile. No sound compromised :)
IMG_1954.jpg
IMG_1956.jpg
↧
Delay engaging drive
Have a Cuze LTZ 2011 1.4 auto six spd. Have noticed a few times when selecting Drive from a stopped position that it pauses before engaging drive. In fact I thought a couple times it engaged only to hear it rev up and then engage drive. Anyone know when this fluid should be changed? Must be some sort of inspection hole for level but no dip stick. I am thinking maybe the solenoid is sticking but could be other things to. Nobody has ever indicated a low fluid level or added any, does the trans have any indicator for low fluid?
↧
↧
2012 1LT RS Manual help!
Hello fellow cruze members, I recently bought a used 2012 1LT RS Manual and absolutely love the vehicle. I have a lot I want to do to it and would love ideas but I have a problem.
I recently went in and installed my sub and amp in the car but in the process, I pushed through the grommet that has a big wire loom that goes into the engine bay and cut a few wire?
The tool I used was a PLASTIC panel popper so I know that the wires that got cut weren't grounded to bare metal by any means.
After finding the wires that were cut and creating a jumper or taping them up, I can start and drive the car, but I still have a few lights on the dash. I currently have traction control (which I know isn't working), parking brake stays on after I release it(the brake works and the system still notifies me to release the brake while moving), ABS light is on(I don't know if it is working and don't really want to test it myself), the powering steering light is on(is working), and the DIC informs me to service power steering.
Now I know I'm going to get a lot of crap for this but the panel popper slipped when I was shoving it through and thus caused the headache I now have. If anyone can give me insight on what to look for or what I should, that would be helpful! Thanks!
PS. The passenger driving light doesn't come now either so if this is related or a seperate issue that would be helpful. I know it is getting power because the bright will come and I replaced the blub and still nothing.
↧
Drove a 2018 Equinox Premier today - WOW - My Review
I had the opportunity to drive the all new Equinox today, and wow. Just wow.
As you all know, the previous generation Equinox was boring, and as soon as I opened the door to this thing the "ahhhhhhhhh" angels singing sound effect was going through my head. The one I test drove was a fully loaded AWD Premier model and stickered for $38k. It had the sun and sound package which added the awesome Bose sound system and a panoramic sunroof. I was never really a fan of those, but working in the car business they have grown on me.
The engine is what impressed me the most here. The 2.4L in the previous generation was a DOG. I had one for a service rental and I wanted out immediately. The new 1.5L turbo that was in this was surprisingly peppy! Lots of mid-range torque and the transmission shifted in right in the powerband. I did not floor it out of respect to the next owner of the car, but I can say it is a perfect middle ground between the 3.6L V6 and the 2.4L. Handling was about average, pretty much on par with any other crossover. I did not drive it long enough to get any fuel economy numbers, but the window sticker said 30 MPG highway. It does have the Auto-Stop technology that I wish you could turn off, but it worked well when it engaged.
The interior is comfortable, pretty, and quiet. The only real gripe I had was the seats were a little too short on the bottom for my liking, but I adjusted it and found a good position. It had more side bolstering than I expected, which is awesome for me but I can see this being an issue for heavyset individuals. You get the Android Auto and Apple Car Play, along with the OnStar 4G LTE hotspot. A feature that surprised me was the rear heated seats, that you can select to back heat or heinie and back! The rear cargo area looks bigger to me too!!
Lots of safety features are included in this car. The list can be found here: Safety First for the All-New 2018 Chevrolet Equinox
The surround vision when I engaged the backup camera is awesome and extremely helpful.
The exterior of the car is nice, but it looks like any other crossover in my opinion. It is A LOT better than the previous generation, but just "meh" to me. To really appreciate the new Equinox, you have to drive one.
![]()
![]()
![]()
These were dealer photos, not as good:
![]()
![]()
As you all know, the previous generation Equinox was boring, and as soon as I opened the door to this thing the "ahhhhhhhhh" angels singing sound effect was going through my head. The one I test drove was a fully loaded AWD Premier model and stickered for $38k. It had the sun and sound package which added the awesome Bose sound system and a panoramic sunroof. I was never really a fan of those, but working in the car business they have grown on me.
The engine is what impressed me the most here. The 2.4L in the previous generation was a DOG. I had one for a service rental and I wanted out immediately. The new 1.5L turbo that was in this was surprisingly peppy! Lots of mid-range torque and the transmission shifted in right in the powerband. I did not floor it out of respect to the next owner of the car, but I can say it is a perfect middle ground between the 3.6L V6 and the 2.4L. Handling was about average, pretty much on par with any other crossover. I did not drive it long enough to get any fuel economy numbers, but the window sticker said 30 MPG highway. It does have the Auto-Stop technology that I wish you could turn off, but it worked well when it engaged.
The interior is comfortable, pretty, and quiet. The only real gripe I had was the seats were a little too short on the bottom for my liking, but I adjusted it and found a good position. It had more side bolstering than I expected, which is awesome for me but I can see this being an issue for heavyset individuals. You get the Android Auto and Apple Car Play, along with the OnStar 4G LTE hotspot. A feature that surprised me was the rear heated seats, that you can select to back heat or heinie and back! The rear cargo area looks bigger to me too!!
Lots of safety features are included in this car. The list can be found here: Safety First for the All-New 2018 Chevrolet Equinox
The surround vision when I engaged the backup camera is awesome and extremely helpful.
The exterior of the car is nice, but it looks like any other crossover in my opinion. It is A LOT better than the previous generation, but just "meh" to me. To really appreciate the new Equinox, you have to drive one.

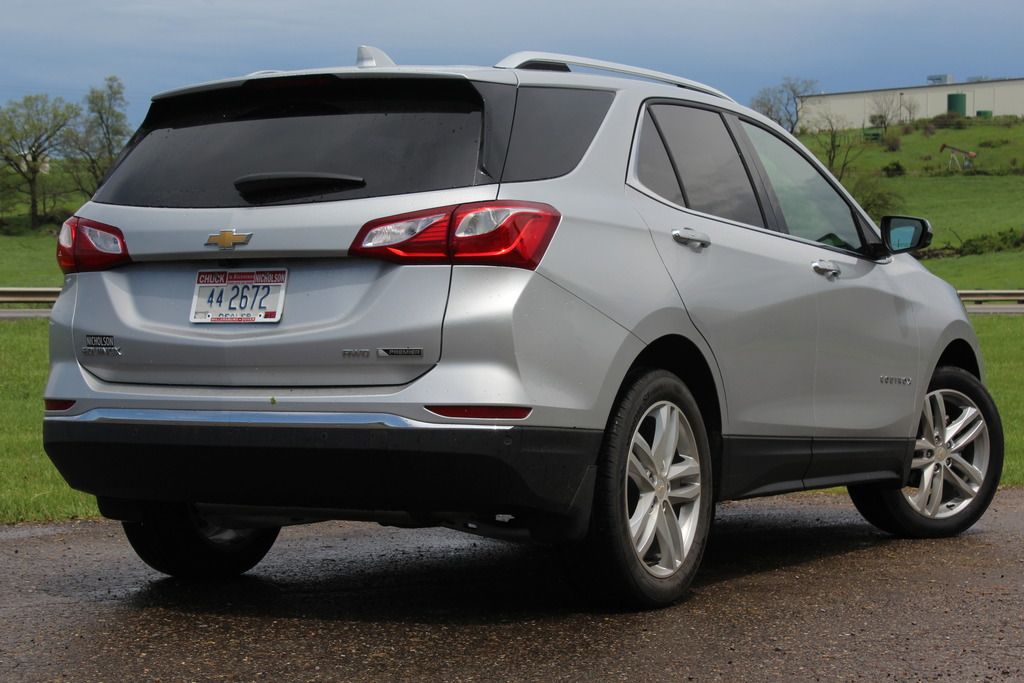

These were dealer photos, not as good:


↧
Can someone post installation instructions for #13478514 illuminated door sill plates
Has anyone installed the #13478514 illuminated sill-plates in a 2017 Cruze Hatch? If so, and you still have the instructions, it would be great if you could post them here since I want to see how the electrical connection is made. I was hoping that the connector would be below the factory sill plate, but the car does not come with sill plates, so I want to see if I have to drill into the area where the illuminated one goes. Thank you.
↧
2nd gen aem intake available now
NEW PRODUCT ALERT
In stock now at BNR: AEM Intakes for your 2ND GEN CRUZE LE2! On sale for the first 5 orders, add to cart to see sale price!
2016+ Chevrolet Cruze LE2 AEM Intake
In stock now at BNR: AEM Intakes for your 2ND GEN CRUZE LE2! On sale for the first 5 orders, add to cart to see sale price!
2016+ Chevrolet Cruze LE2 AEM Intake
↧
↧
Any issues with swapping 1lt (16) oem wheels with 2lt (17)?
I'm planning on replacing my 1LT 16 inch wheels with Firestone FR710's with a set of 2LT 17 inch oem wheels wrapped in Continental TrueContact's (94T) on my 2012 1LT RS. I'm just wondering if anyone has done this and had any issues?
The 17's will be a little bit wider, while the current 16's are already very close to the guards in the wheel well as seen here:
cruzewheelwell.jpg
There's just room for a finger or two between the guard.
The 17's will be a little bit wider, while the current 16's are already very close to the guards in the wheel well as seen here:
cruzewheelwell.jpg
There's just room for a finger or two between the guard.
↧
Kansas City Cruzes
Anyone located in or near KC interested in starting a cruze group. And setting up a meet?
↧
2010 jg holden cruze diesel
Hi everyone
I have a 2010 jg holden cruze with 157000kms on the clock. There is 1 issue with the car it starts and idles fine then when you drive it and start to load the engine up when its temperature is cold the car jerks backwards and forwards and engine light flashes until you push the clutch in. The problem goes away once the engine comes up to temp then the car drives perfect no problems at all. You can leave for an hour or so and then drive it and will be fine due to still being warm. If you leave it over night when you go to drive it the same problem happens with jerking and the engine light appearing. If i leave car idling for half an hr before driving the car is warm and no problems runs perfect. Has anybody got any suggestions to fix it.
Thanks
↧
Trifecta tune & scangauge II question
Hey Guys,
so Sunday night i installed my trifecta tune after getting home from the race track, needless to say i was excited. I've noticed some little things seem much better but i cant figure out why the boost levels are still stock. Before tuning the boost levels would peak at 22.5~ psi on my scangauge II . after tuning my boost levels have not changed, I was under the impression that the boost was turned up to 31-33 PSI from reading prior posts. could someone confirm this reading on a scangauge II for me? or do i have to have a mechanical boost gauge to see this?
trying to figure out why I'm not seeing the increased boost pressure, I just submitted a question about my calibration files to trifecta.
thanks,
Justin
↧
↧
AEM Intake Installed

Easy enough install. Took me about 15 minutes. The instructions that came with the intake were crystal clear with pictures. It's a quality kit. The gun metal finish looks great. The hardest part of the install was running the edging around.
↧
FS: 2012 1LT Aluminum Wheels
Looking to sell these locally or will bring to Lordstown meet. $350
Pics are here:Cruze Wheels Slideshow by Tmm217 | Photobucket
Pics are here:Cruze Wheels Slideshow by Tmm217 | Photobucket
↧
Water in Emblem
Hello All,
Has anyone else had water appearing under the yellow plastic of your hood emblem? I hate the way it looks but I do not dare play around with it. Any suggestions?
Has anyone else had water appearing under the yellow plastic of your hood emblem? I hate the way it looks but I do not dare play around with it. Any suggestions?
↧